Recommended Design Procedure

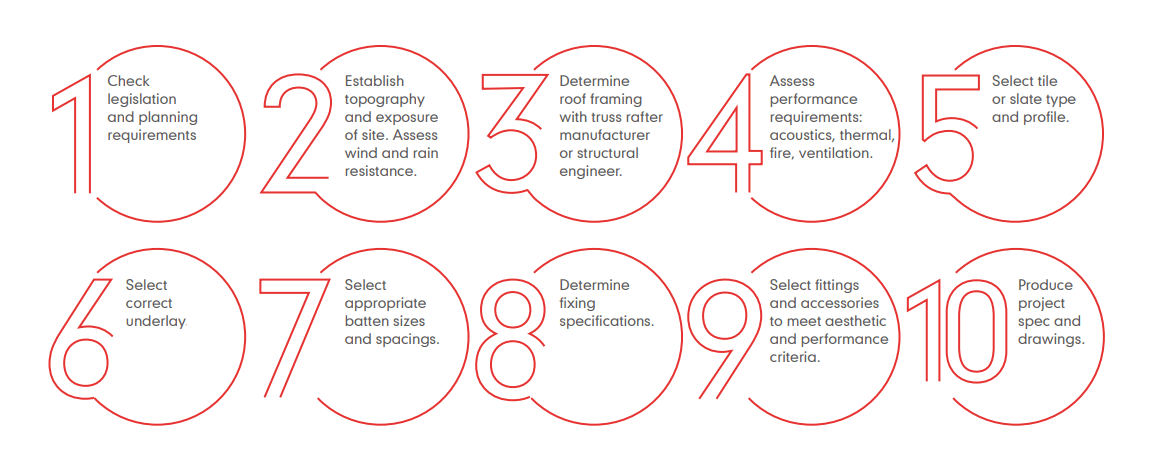
Designers are advised to consider the following steps when commencing a roof design incorporating Marley products.
Reference should also be made to the latest versions of BS 5534 ‘Slating and tiling for pitched roofs and vertical cladding – Code of practice)’, and to BS 8000: Part 6: ‘Workmanship on Building Sites: Code of Practice for slating and tiling of roofs and claddings’ and BS 5250 ‘Management of moisture in buildings – Code of practice’. The following information is provided for guidance only. Designers should ensure that they make all the necessary calculations and take into account all aspects of the specific project design and location.
STEP 1: Legislation and Planning
Planning permission for roofs may be necessary in certain areas and is subject to Local Authority planning, policy and control.
STEP 2: Exposure, Wind and Rain
The UK is divided into four categories of exposure to driving rain and is based on rain penetration data from BS 8104, ‘Code of practice for assessing exposure of walls to wind-driven rain’ and BRE Report 262 ‘Thermal insulation: avoiding risks’. This applies to buildings of up to 12 metres in height at the ridge.
Where the roof slope exceeds 6 metres in length and/or the site is rated to be in a severe exposure category, guidance on the suitability of the roof tile should be confirmed by contacting the Marley Technical Advisory Service.
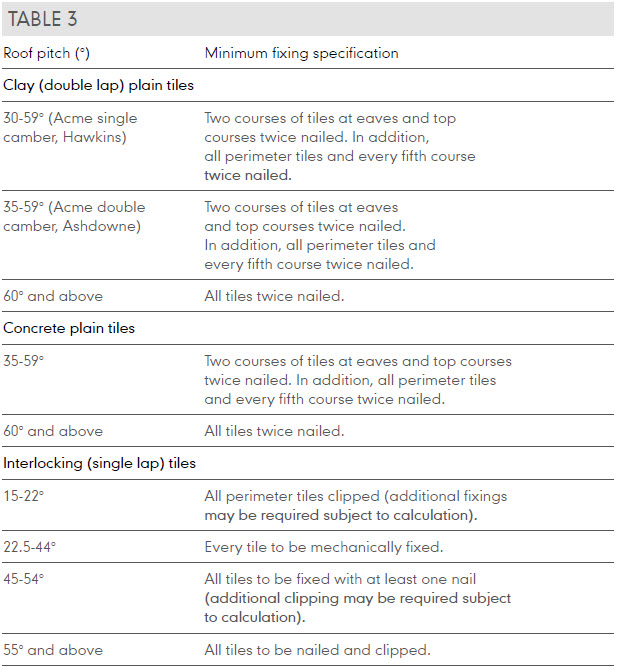
Calculate the wind suction loading either in accordance with BS EN 1991: Part 1-4 or use the design calculations on wind loads in BS 5534. Alternatively, see our online technical tool for a full fixing specification.
STEP 3: Roof Shape and Structure
Determine design of roof and configuration of roof supports with structural engineer and truss rafter manufacturer. Ensure that the roof structure is adequate for the total weight of the tiles as laid, the calculated wind loading and any other relevant loading criteria. Weights as laid can be found on the appropriate product pages.
As a rule, roofs that include hips and/or valleys should have a steeper pitch than simple mono- or duo-pitch roofs. At hips or valleys, the effective pitch of the hip/valley is reduced by 5-10°, making it more vulnerable to water penetration.
STEP 4: Assess performance against regulatory requirements
Roof performance criteria will vary according to design, building function etc., further guidance on controlling condensation risk is can be found in BS 5250. Acoustics, Fire, Drainage, Chimneys and Flues and information on the Regulations in Scotland and Northern Ireland are shown in brief on page 140 of our specification guide.
STEP 5: Tile Selection
The choice of roof covering is a combination of planning, aesthetic and performance criteria. The key factors are shape, size, colour, texture, material and sustainability.


