Weatherboard cladding a comprehensive guide

While brick and rendered finishes are more traditional choices for residential and commercial buildings across the UK, weatherboard is becoming increasingly popular thanks to its aesthetic appeal, energy efficiency, weather performance and long-term durability.
This guide provides a comprehensive overview of weatherboard cladding, covering everything from what it is, its purpose and how it’s different from other types of external cladding, to specification considerations such as fire safety, thermal performance, weather resistance, installation and maintenance.
With the help of this guide, architects, specifiers, developers and property owners should gain a thorough understanding of the benefits of weatherboard cladding and be able to make an informed decision for their next project – whether it’s a new build or refurbishment, a residential home or a commercial property.
What is a weatherboard and how is it different from cladding?
Cladding is a fairly broad term. It describes the outermost layer of the building envelope, a covering that’s designed to protect the structure and enhance its appearance. Cladding can be provided in a wide range of materials, including timber, brick, glass, plastic, fibre cement and stone, and it can comprise products such as tiles, panels or overlapping boards. The choice of what kind of cladding to use often comes down to a product’s aesthetic appeal, as well as its durability, thermal performance, weather resistance, fire performance and maintenance requirements.
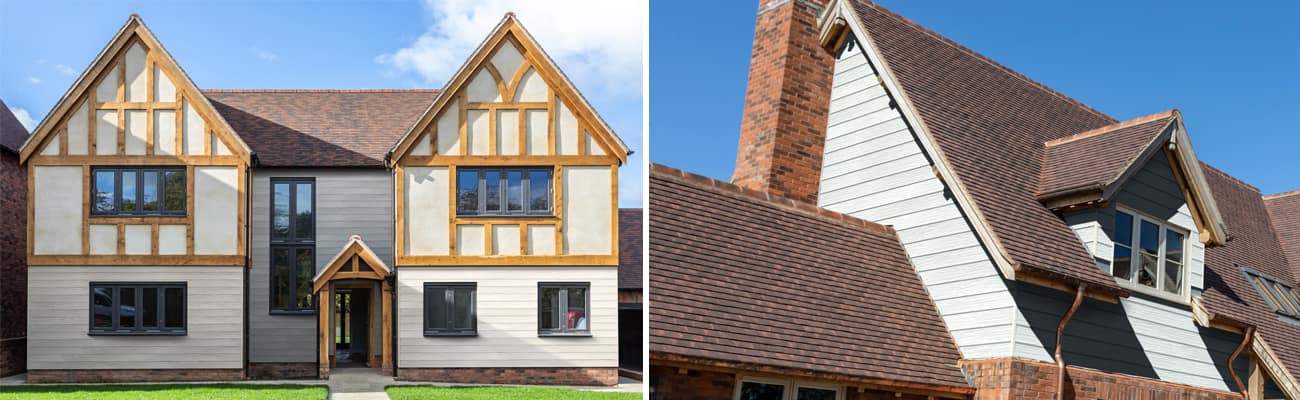
A weatherboard is a specific type of external cladding. It consists of long, narrow planks that are typically installed horizontally in an overlapping shiplap pattern.
What is the purpose of weatherboards?
Phil Wallis, Technical Manager at Marley, explains: “Like any external cladding, the purpose of weatherboard is to protect the structure from the elements and to create a desired aesthetic. It can also be used to cover up problem areas of an existing property’s exterior.”
We like to think of weatherboards as an architectural raincoat – it helps to keep the rain out and the building dry, while also providing a distinctive appearance and hiding any imperfections underneath.
With correct specification and installation, weatherboard cladding can be used to help achieve the requirements of a variety of building standards, including:
- Approved Document B (Fire Safety)
- Approved Document C (Site Preparation and Resistance to Contaminants and Moisture)
- Approved Document L (Conservation of Fuel and Power)
- BS 5250:2021 Management of moisture in buildings
- NHBC Standards 2025 (6.9 Curtain walling and cladding)
What are the benefits of weatherboards? Why use weatherboards?
So why use weatherboards? Here are some reasons why weatherboards are specified instead of other options.
Weather protection
As discussed already, weatherboards can help protect external walls from rainwater ingress. Phil explains: “The overlapping planks are modelled after the outer hulls of old sailing ships, which were designed to keep water out." Similarly, weatherboards channel rainwater away from a building and help prevent moisture from seeping into the structure. "This makes weatherboards especially suited for environments prone to heavy rainfall and wind-driven rain," Phil adds.
Whatever the typical weather conditions, weatherboards reduce the risk of damp, safeguarding the health and wellbeing of occupants, as well as the structural integrity of the building.
Phil warns that damp can lead to the growth of mould and mildew: “These can cause problems with indoor air quality, potentially leading to respiratory issues, allergies and other health concerns. Moisture ingress can also cause rot and decay that could weaken the entire structure.”
The weather resistance of Marley's Weatherboard system has been successfully third-party tested by UL Solutions (Certificate Number R41360-1) using the Centre for Window & Cladding Technology’s (CWCT) sequence B test.
Appearance
In terms of aesthetics, weatherboards can be used to achieve desired designs in both modern new builds and traditional properties. It often has a natural woodgrain texture that is a popular choice and considered appealing.
Refurbishments
For refurbishment projects, weatherboards can be used to update the appearance of a property or cover up existing minor or cosmetic issues. Phil notes: “This can be a cost-effective way to enhance a building’s appearance.”
What is a weatherboard made of?
Traditionally, a weatherboard was made from timber, but other materials are now available.
Fibre cement weatherboards, such as Marley Weatherboard, are produced using a combination of cement, cellulose fibres and other additives. This mix creates a dense, stable board that can mimic the appearance of timber while offering consistency in size and shape.
Phil adds: “Compared to timber, fibre-cement is less prone to dents, cracks or damage, and it doesn’t split. It offers improved fire performance than timber and does not warp, rot or succumb to insect damage. It also requires less maintenance, as there’s no need for regular painting.”
What does a weatherboard look like?
Weatherboard looks like wooden planks that are installed on the outer wall of a building. They are usually installed in rows that overlap slightly, giving them a slight angle and a shiplap appearance.
Fibre-cement weatherboards usually include a faux woodgrain pattern to mimic the look of natural timber, and some products can be provided with a smooth finish for a different aesthetic. These products are provided pre-finished in a range of standard colours.
How are weatherboards installed?
The most common installation method for weatherboarding is attaching timber battens vertically to the walls and then fixing the weatherboard to the battens. This method creates a ventilation cavity behind the cladding. A nominal gap should be maintained at the top and bottom of the cladding, including at doors and windows, to allow air to circulate and to help prevent interstitial condensation and damp.
Installing weatherboards as a ventilated cladding system is a straightforward process:
- Surface preparation – Before installation, ensure the surface that the weatherboard will be attached to is sound, free from obstructions, defects and able to withstand the design load requirements of the products. A vapour-permeable underlay, such as Marley Universal, should be installed to provide additional weather protection and moisture management.
- Batten installation – Battens are installed to provide a fixing point for the weatherboards. We’ll cover batten installation in more detail in the next section.
- Fix the starter profile, perforated closure and complementary edge trims – The starter profile, which ensures the correct board angle, and the perforated closures can now be fixed to the bottom of the battens.
- Cut the weatherboards to size – Next, cut the weatherboard to the necessary size. Marley’s fibre-cement weatherboards can be cut using standard tools, such as a handsaw, circular saw, guillotine or electric jigsaw, and they are fixed to the battens using screws or nails.
- Apply finish where necessary – Marley Weatherboard is provided fully finished in a range of colours. Where the boards have been cut to length, the cut end should be painted using a colour match touch-up paint.
- Fix the weatherboards to the battens – The weatherboards can now be fixed to the battens according to the manufacturer’s instructions. Phil says: “For Marley Weatherboards, screw fixings are recommended; however, nails can also be used. Whichever option is used, remember that the head of the screw or nail should sit flush with the surface of the weatherboard, taking care not to over-fix and boards should be fixed at least once to every batten.” He says installers should start with the bottom row, working upwards and ensuring an adequate lap with each new row.
- Install vertical profiles – Position, level and attach end profiles, corner profiles and window profiles as required.
- Top row installation – The top plank will have visible fixings, so consider using colour-matched screws. Perforated closures are also available to protect against vermin and some insects when terminating the weatherboard cladding beneath a soffit.
- Corners – If vertical trims are not being used, corners can be installed with one side overlapping the end of the plank on the other side. This means there will always be one end of the plank showing. These ends should be finished to match the weatherboard. Alternatively, mitred corners can also be formed with careful measuring and cutting.
How are weatherboard battens installed?
While a lot of attention may be given to how the cladding is fixed to the battens, the method of securing the battens to the wall is very important. The method of installation for battens will depend on the substrate and if additional insulation is being installed. The connections between cladding support battens and the backing wall should be designed by a structural engineer. Battens should be spaced a maximum of 600mm apart to ensure proper support for the weatherboards.
Are roofing battens suitable for weatherboard cladding?
Roof battens are not typically suitable for weatherboard cladding because they are preservative-treated to Use Class 2 in accordance with BS 8417: 2024 Preservation of wood. Code of practice. Rainscreen cladding must have a higher level of protection; therefore, Use Class 3 preservative treatment is required.
Use Class 3 timber battens are designed for external use but should not come into direct contact with the ground or be exposed to prolonged or frequent moisture. Specifying the right type of batten will help maintain structural integrity and reduce the risk of decay over time.
Is weatherboarding waterproof?
Weatherboard cladding is designed to provide weather protection, but it is not entirely waterproof. The overlapping panels deflect rainwater and prevent moisture from getting inside the walls. A vapour-permeable membrane should be installed on the wall behind the battens, adding another layer of protection should any moisture bypass the external cladding. This is supplemented by a continuous ventilation path.
Can insulation be installed behind weatherboarding?
Yes, insulation can be installed behind weatherboards to bring down the U-values of the wall build-up and improve the building’s thermal efficiency.
Phil explains that if insulation is installed with weatherboarding, it is likely that a lightweight metal frame comprising helping hand brackets will be required. “This is a type of support structure designed specifically for ventilated facades. It comprises steel or aluminium L-shaped brackets and support rails,” he says.
When using metal frames, be sure that the system meets the requirements set out by the CWCT and the NHBC Standards 2025. The suitability of the metal frame will depend on assessment and design by a qualified structural engineer who will ensure it can support the building’s design loads.
What are the applications of weatherboarding? Where is it used, and on what types of buildings?
Weatherboarding is a highly versatile cladding that is used in a wide range of sectors and building types. Here are some typical applications for weatherboard:
- Residential: From single-family homes to blocks of flats, weatherboard can be used to create a high-quality exterior finish on any dwelling. It is suitable for use in coastal areas, where it can provide extra weather protection while complementing the surroundings.
- Commercial: Shops, retail spaces, offices, hotels, leisure facilities, cafés and restaurants can all benefit from weatherboard cladding.
- Education and health: Weatherboards can help create a welcoming appearance, while their low maintenance requirements help keep long-term costs to a minimum.
- Leisure: Weatherboarding may be a popular choice for a wide range of leisure facilities, such as gyms, sports facilities, hotels and resorts.
Can weatherboard cladding be installed on existing buildings?
Weatherboard cladding is often specified for new-build developments, but it is also an excellent choice for renovation and refurbishment projects.
Phil points out a key reason for the popularity of weatherboard on existing buildings is that it provides a simple solution for updating the appearance of the structure. “Weatherboard cladding is often used to transform the appearance of a property whilst bringing the benefits of added weather resistance and low maintenance requirements,” he says.
What is the fire performance of weatherboarding?
Fire safety is a top priority when selecting any building product.
Approved Document B (Fire Safety) outlines the requirements for the fire performance of buildings in England. Similar regulations are in place in Scotland, Wales and Northern Ireland.
The Approved document places restrictions on the combustibility of cladding, with different requirements depending on the type of building, its height and its distance from boundaries. Marley Weatherboard has undergone fire testing by BRE Global and has achieved a fire rating of A2-s1, d0 in accordance with BS EN 13501-1: Fire classification of construction products and building elements. This means:
- A2: Limited combustibility; materials won't ignite and contribute to fire spread
- s1: Smoke emissions absent or very little
- d0: No burning droplets
When assessing the overall fire performance of a building, including wall build-up, all elements of the construction should be considered to ensure full compliance with Approved Document B.
What are the care and maintenance requirements of weatherboarding?
Depending on the type of weatherboarding used, the care and maintenance requirements can vary. Timber weatherboards, for example, will require regular repainting to maintain their appearance and weather resistance. Alternative products like fibre-cement weatherboarding don’t have this requirement.
Thanks to its fibre-cement composition and factory-applied finish, Marley Weatherboard will maintain its appearance with minimal effort for many years. It is also resistant to warping, rot and insect damage.
Typically, Marley Weatherboard products maintain their strength, properties and function without any maintenance. However, weathering can affect their visual appearance. To ensure longevity, it's recommended to inspect the ventilation gaps, joints and fixings annually and address any possible damage. This will help secure a prolonged lifetime for the Marley Weatherboard.
If cleaning is required, this can be done with a gentle detergent and water. Harsh chemicals, abrasive tools and high-pressure washers should be avoided, as they could damage the surface finish.
What is the lifespan of Marley Weatherboard?
With correct installation and maintenance, Marley Weatherboard will provide a typical life expectancy of 50 years.
How can I find out more about Marley Weatherboard?
Thanks to its weather resistance, straightforward installation and long-term durability, Marley Weatherboard is an ideal cladding choice for a wide range of new-build and refurbishment projects, from residential homes to commercial buildings.
For further information on specifying Marley Weatherboard for your next project or to purchase the product directly, contact the Marley team today.
Disclaimer - The information shared in this blog is correct at the time of publication. Guidance, standards, and best practices may change over time, so if you’d like further clarification or the latest updates, please get in touch with the Marley Technical Advisory Team, who will be happy to help.