How to fix ridge tiles to a roof

Ridge tile fixing: how to fix ridge tiles to a roof
For roofing projects, proper ridge tile fixing is critical for ensuring a roof’s longevity, weather tightness and aesthetics. Fixing ridge tiles to a roof is normally a straightforward task for an experienced roofer, but the right method and materials are essential for high-quality results that are compliant with current British Standards.Kevin Taylor, Training and Technical Support Manager at Marley, explains that in recent years, the standards and preferred installation methods for roof tiles have changed. “The updates have mainly aimed to reduce the number of defects with roofing work,” he says.
“Mortar bedding, for example, is less likely to be specified these days. Instead, dry ridge systems, which are mechanically fixed, are much more common,” Kevin says.
In this blog, we’ll take an in-depth look at ridge tile fixing – what it is, the methods available and how to ensure roof ridge tiles remain well secured, aesthetically pleasing and weatherproof.
What are ridge tiles?
Ridge tiles are an important element of pitched roof construction. They run along the apex of the roof, where two pitched roof planes come together, providing an attractive finish and weather resistance.“If ridge tile fixing is done correctly, the finished installation is secure, looks good, provides protection against rainwater ingress and, if dry ridge systems are used, also offers adequate ventilation to help control condensation,” Kevin explains.
“Get it wrong, however, and the ridge tiles could come off, the top edge of the roof could leak and there could be an increased risk of condensation,” he warns.
What types of roof ridge tiles are available?
Available in clay or concrete, and in a range of colours, roof ridge tiles can be decorative or plain, and the two main design choices are half-round and angled. Some ridge tiles which overlap each other at one end are known as capped or collared ridge tiles. The right option will depend on the style of the house and the roof tiles being used; the process of ridge tile fixing will vary, depending on what type of tile is selected and whether mortar or dry fix is used.Comparing ridge tile fixing methods
Traditionally, ridge tile fixing involved bedding and pointing in mortar. However, to install bedded ridge tiles well takes a lot of skill and practice, mixing and carrying mortar up the roof can be hazardous, and there is always a risk that mortar can run down the roof and stain the tiles. Mortar is also susceptible to cracking and falling out, which can lead to ridge tiles becoming loose or dislodged, posing a potential risk to people on the ground below. Given that almost 70% of all roof failures are thought to be mortar related, it is no wonder that dry fix systems have become the more popular choice.Kevin explains the benefits of dry fix ridge systems: “Dry fix ridge systems use nails, screws, unions, clamps, and brackets to keep the tiles in place. This mortar-free method is now the norm and is preferred for compliance reasons.” We’ll discuss the requirements of BS 5534:2014 + A2:2018 in the next section.
“It’s also safer, easier, faster, maintenance fee and can be guaranteed for 10–15 years, unlike mortar, which many roofers are only prepared to guarantee for two years,” Kevin adds.
He continues: “Mechanical ridge tile fixing also includes built-in continuous ventilation for the roof space, helping to prevent condensation and control moisture in buildings.”

Do ridge tiles have to be mechanically fixed?
To achieve compliance with the British Standards, mechanical ridge tile fixing is required for new-build and refurbishment projects.While mechanical fixing is the best and safest method for ridge tile fixing, in some rare cases, such as heritage projects, it may not be appropriate. In these cases, BS 8000-6 (Workmanship on construction sites. Slating and Tiling of roofs and walls. Code of practice) does state that traditional mortar bedding (without mechanical fixings) may be acceptable, but this must be carefully planned and agreed by all stakeholders, including insurers, as the fixing of the ridge tiles would no longer be compliant with BS 5534.
Ridge tile fixing using mechanical and dry-fix methods
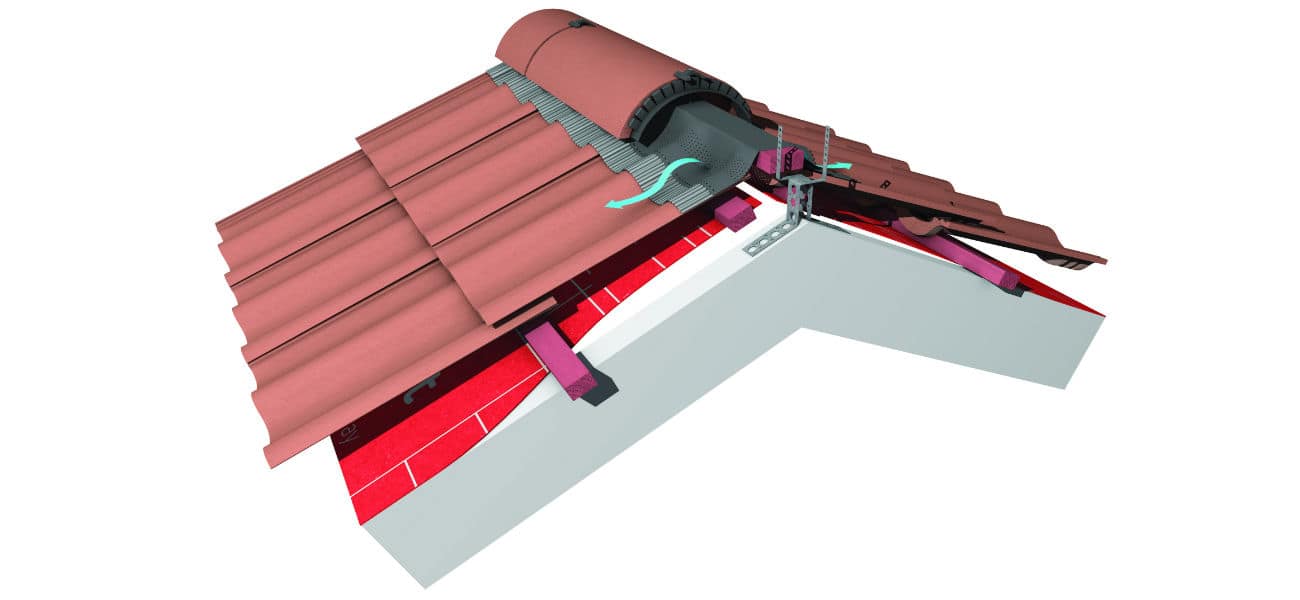
Mechanical and dry fixing methods offer both ease of installation and superior performance.Marley’s Ridgefast system, for example, is a simple and rapidly installed dry-fixed ridge ventilation system suitable for duo-pitch roof applications.
To install ridge tiles using this system, begin by laying the roof underlay and battens in the normal manner, leaving a minimum 5mm continuous gap at the roof apex. Before fixing the top course tiling batten, fix the ridge batten brackets to each rafter at the required height setting where needed. Then attach the top course tiling battens over the brackets.
Next, fix the ridge battens along the length of the ridge using the brackets to hold them in place. On securing the ridge batten, you can complete tiling the roof as usual.
Once the top course of roof tiles is in place, roll the RidgeFast roll out centrally, along the entire length of the ridge overlapping the product by 100mm at joints, and fix it into the ridge battens at approximately 2m centres. Remove the paper covering the butyl strip and firmly press the corrugations onto the roof tiles starting with the profiles and moving to the troughs.
Next, lay the first ridge tile (which may be a special block-end ridge) in the correct position and secure it to the batten. Connect the next ridge tile using a ridge union and union clamp. Push it firmly into position, fix it in place and repeat the process along the ridgeline.
Combining mortar bedding with mechanical ridge tile fixing
For those who prefer the traditional look of mortar bedding or have projects that stipulate it, there’s also the option of combining mortar bedding with mechanical fixing. The Marley Mortar Bedded Security Ridge system was designed for this type of project and can be used to achieve compliance with BS 5534.Ridge tile fixing with Marley’s complete roofing system
The Marley ridge tile fixing systems are compatible with a wide range of roofing materials, including products from other manufacturers. It can also be provided as part of our complete roofing system.
Contact our team to discuss using a dry ridge system for your next building project or use our installer locator to find a local network ready to support with installing your dry ridge system.
Disclaimer - The information shared in this blog is correct at the time of publication. Guidance, standards, and best practices may change over time, so if you’d like further clarification or the latest updates, please get in touch with the Marley Technical Advisory Team, who will be happy to help.
Category: Accessories FAQs Ridge Tiles Roofing